
I watched a video where someone appeared to be able to service the printhead from the top of their Epson Stylus Pro 3800 printer instead of having to remove all of the panels and other parts. I was excited to see this was an option because that would cut a lot of steps and risk out of the entire servicing process. However about halfway through getting the inkjet printer ready, I noticed they cut out part of the middle silver exterior panels where you can see the print head sliding left to right. I was a little frustrated that I didn’t catch that at first. But I started thinking of alternative ways to access the printhead without cutting or modifying any of the exterior panels.
Are you currently experiencing poor printing performance with your Epson Stylus Pro 3800 / 3880 / or SureColor P800 printer? More often than not, it’s a printhead problem. You may need to manually clean your printhead. By cleaning the printhead, we will be manually cleaning and restoring the ink cartridge flow to the printer. Greatly improving print quality while saving money learning how to clean your printer from home. Including making your own printer head cleaning fluid using everyday items in your home instead of buying!
There are a wide variety of problems that can occur with printers, but one of the most common is with the printhead. The good news is that most likely your printhead is not broken, just merely clogged and in need of a thorough cleaning.
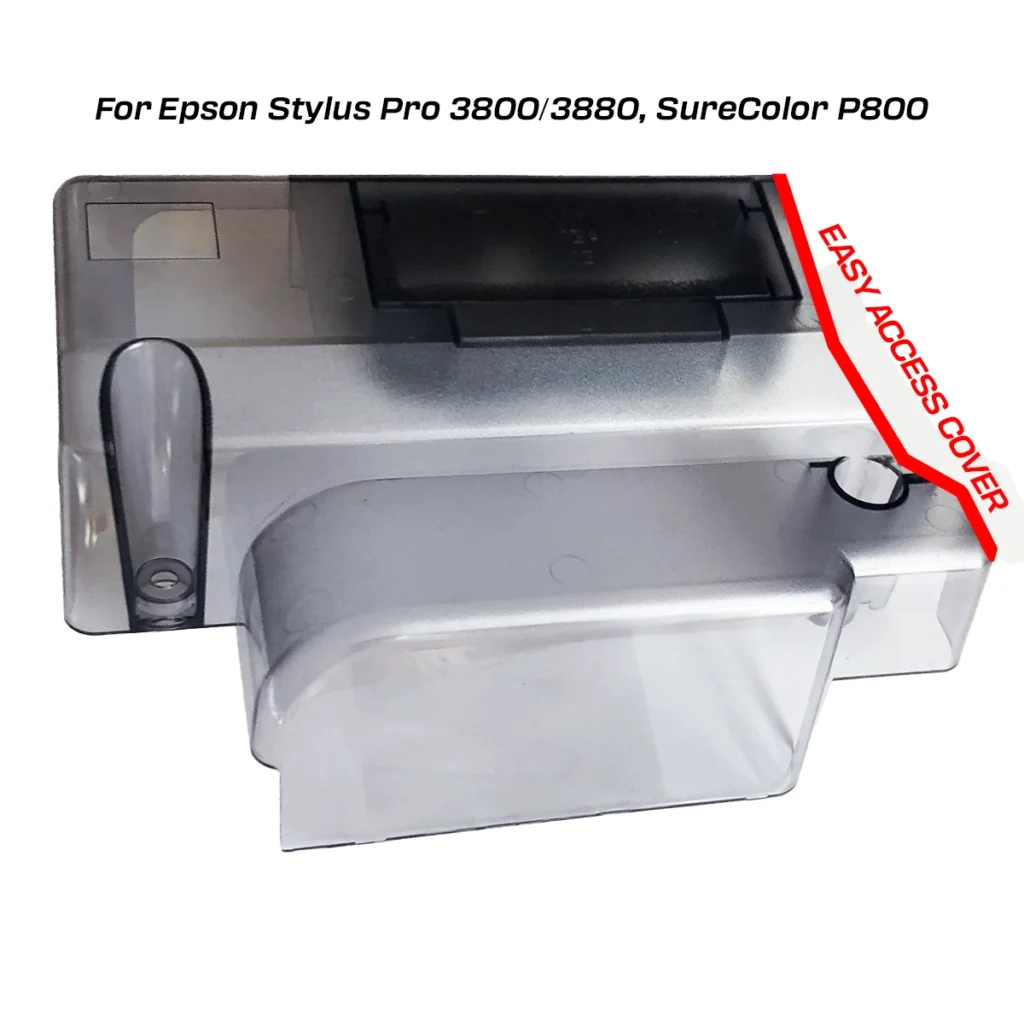
The method we wrote is a much cleaner and easier trade off and will leave you with a clean printhead without the risk of bricking it. You will be removing a clear plastic cover that you can either modify for easier removal and installation or remove it altogether. This may seem tedious at first. But it’s a much safer process if you’re not comfortable going further removing panels and other parts. I prefer having the clear plastic cover off for easier access and servicing. But ultimately, the cosmetic appearance is your preference.
Before you consider calling a printer repair service or replacing your printhead, follow these steps for cleaning and unclog it.
Tools Needed:
Philips Screwdriver – Preferably longer for easier access to tight deep down areas.
Printhead Service Syringe
Scissors
Sharp Flush Cuts – I picked up a pair of Klein flush cuts from Home Depot for $9 a couple years back. They’re now $12
If you plan to modify and re-use the clear plastic cover, a Sawzall will make the process easier.
For Cleaning:
Paper Towels
Parchment Paper
Q-Tips – Lint free is preferred but not required.
70-91% Isopropyl Alcohol
Regular Blue Windex with Ammonia
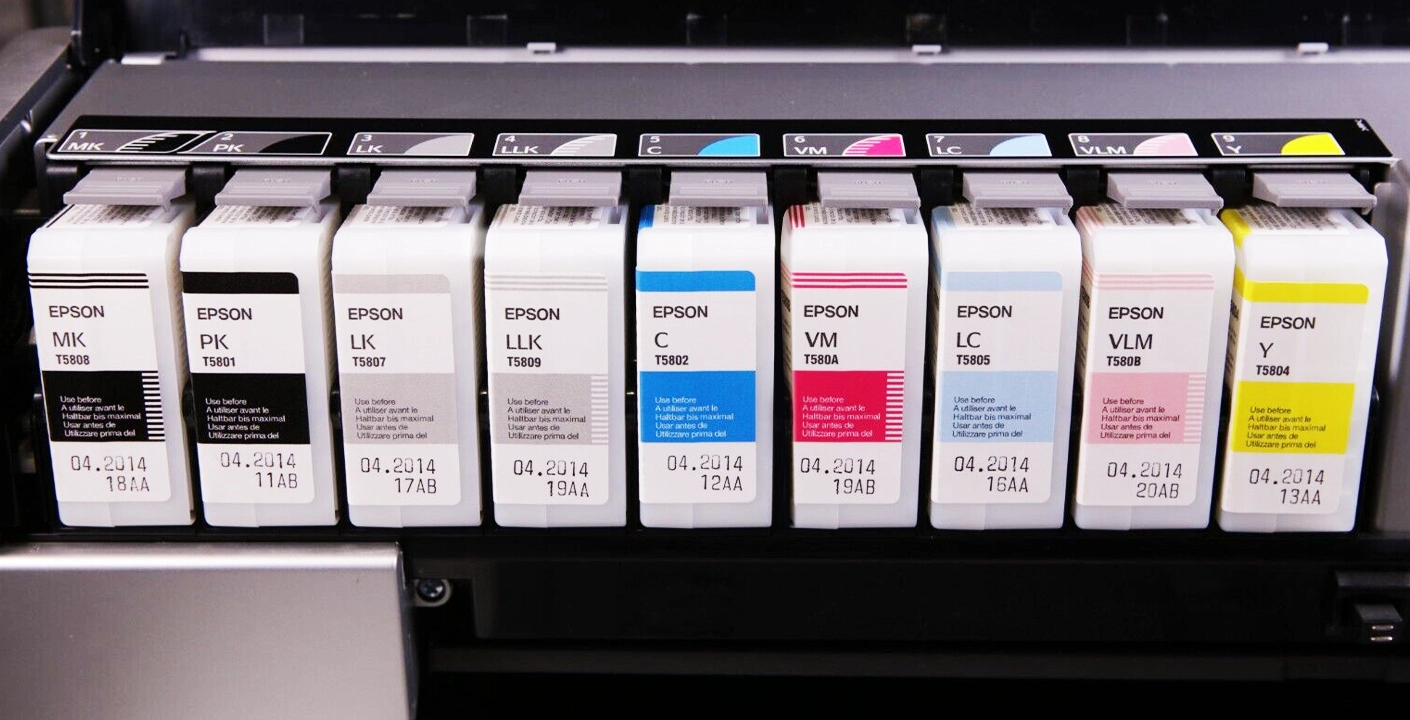
Diagnosing Problem Colors
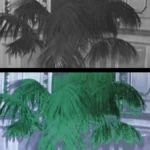
Perform a nozzle check to identify which colors will need servicing. If you have not printed one, print a test page either from the printers driver software, or from the printers navigation menu. Once that finishes printing, you will see which colors are printing normally, while a lack or break of ink represents a clogged printer. Save this page as your map for which color channels to service later.
Preparation
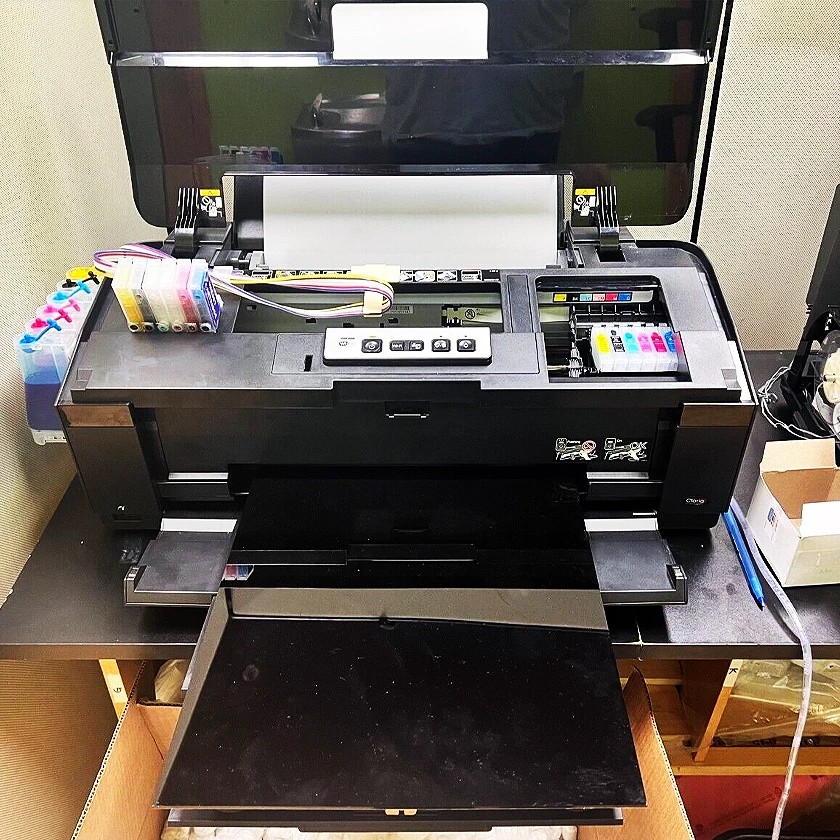
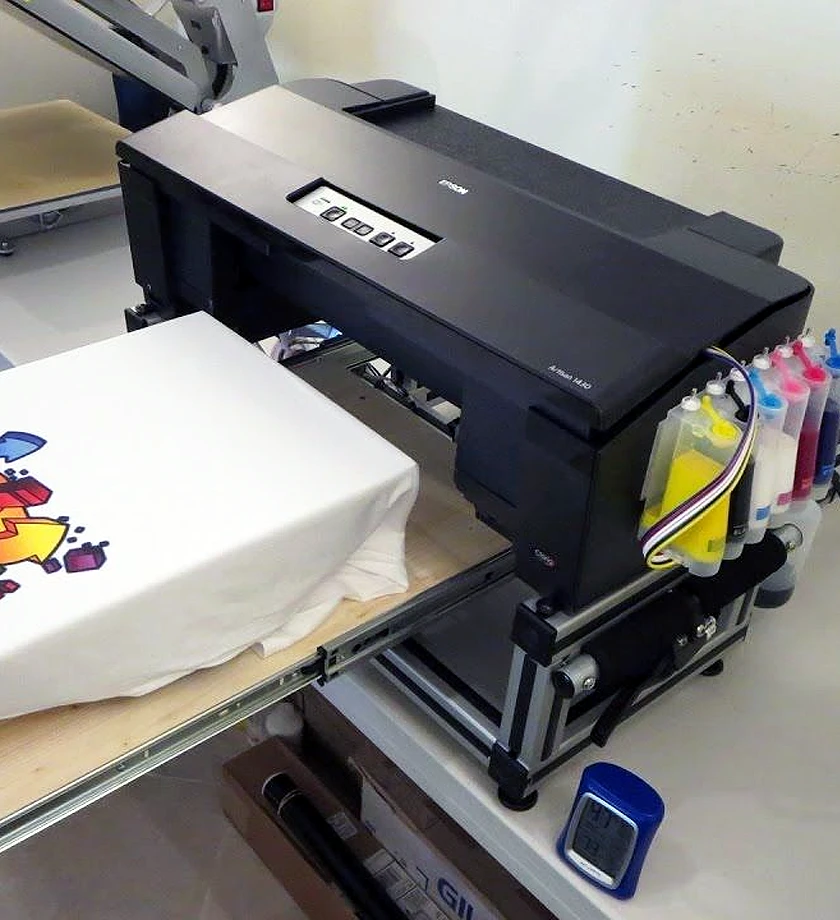
Turn your printer on with the middle printer panel exposing the printhead open. When the printer is performing it’s start up phases, unplug the power cord as soon as you see the print head sliding to the left. Followed by pressing the printers power button on and off to remove any residual power from the printer.
When you slide the printhead unit to the left to access the printhead, you’ll notice there is a clear plastic cover over the printhead with 2 screws holding it down. Loosen and remove the screws while the printhead is in the middle of the printer. Then slide the clear plastic cover towards the right and adjust it to start beginning to cut the side pieces off so it can move around easier. Both left and right sides should be completely removed, leaving the top part and half of the front.
Whichever way you’re able to move the clear plastic cover around to cut it, just make sure that small plastic bits don’t end up somewhere they should inside the printer. We vacuumed the inside of our printer after removing any visible clear bits of cut plastic.
If you wish to keep the clear plastic cover, please view the image below showing where the cut lines should be using a sawzall or flush cuts. This will allow for quick and easy access in the future.
Once the clear plastic cover is removed, you can now carefully disconnect any ribbon cables and connections in your way. Leaving limited, but accessible space to remove the two screws holding the printhead in place.
Remove the two screws. Once the two screws are removed, gently rock back and forth while firmly lifting the ink supply unit upwards, away from the printhead. It may take a few tries, but eventually you will feel the ink supply unit separating from the printhead while lifting.
You now have access to each color channel without removing the printhead assembly or removing any panels.
Now that you have clear and somewhat limited access to the printhead, we can begin the servicing process. Your can either use a terrycloth towel or paper towels. Some will argue that terrycloth is cleaner. If you’re in a bind and don’t have a lint-free towel, paper towels will be fine.
Cut a roughly 1.75” by 6” or longer piece of towel and matching size sheet of parchment paper. For a paper towel, we folded a small square sheet into 4 layers. Place the parchment paper under the lint-free towel or paper towels, followed by applying a drop of isopropyl alcohol to the edge were going to slide the printhead over. Putting a drop of liquid on the edge while smoothing it out will create a ramp for the printhead to easily slide over the towel and parchment paper. Place paper in line of printhead inside printer making sure the parchment paper is on the bottom. Now slowly and gently lift the printhead unit and slide to the left, over the dry towel and parchment paper.
When you can see both sides of the dry towel, you can relax the printhead on it and begin the cleaning and flushing process.
Note: If it’s your first time opening your printer up in this fashion, the gray transparent printhead protective cover in order to gain access to the printhead and color channels may be broken beyond repair. Don’t worry, it happens all the time. We offer custom cut and verified to install correctly original printhead covers! This printhead cover is modified to allow easy install and removal while retaining 90% of the original cover! Now servicing and protecting your printer has never been easier.
Cleaning Solution Mixture
Never pay for a printhead cleaning solution you can create at home using products you already have! Every clear or blue tinted bottle you see for sale online is literally this mixture at different ratios. Save money and time by creating your own printhead clog cleaning solution.
There have been a lot of recommendations for what works best clearing out tough ink deposits. What works best in our experience is roughly 80/20% mixture of 91% isopropyl alcohol and classic blue Windex WITH ammonia. Make sure it’s the original with ammonia and not anything else. Creating the faintest blue tinted cleaning solution that you can see. Followed by only 91% isopropyl alcohol for the final flush.
You can use any isopropyl alcohol ranging from 70-91%. 91% is preferred.
Cleaning / Flushing / Servicing A Clogged Printhead
If you have time, a safe way of preparing the ink system for a flush would be to soak a towel in cleaning solution and place parchment paper under it to prevent spilling and slide it under the printhead.
Rest the printhead on the soaked towel for 15 minutes to overnight if you’d like. After you rest the printhead, grab both sides of the towel and slide if left to right like shining a shoe. This will soften up all ink deposits that have collected on the bottom of the printhead.
You will have to run the print cleaning cycle operation through the printer software up to eight times to get ink flowing completely again. Printing a nozzle check pattern after one or two print head cleaning operations will tell you whether or not going the clog will break.
This part requires paying attention to detail because you will be using a liquid cleaning solution inside the printer. Liquid and electronics do not mix and can leave you with a brick to part out if an accident happens. It goes without saying that you should go slow and take your time during this process. Making sure absolutely no liquid goes anywhere it shouldn’t.
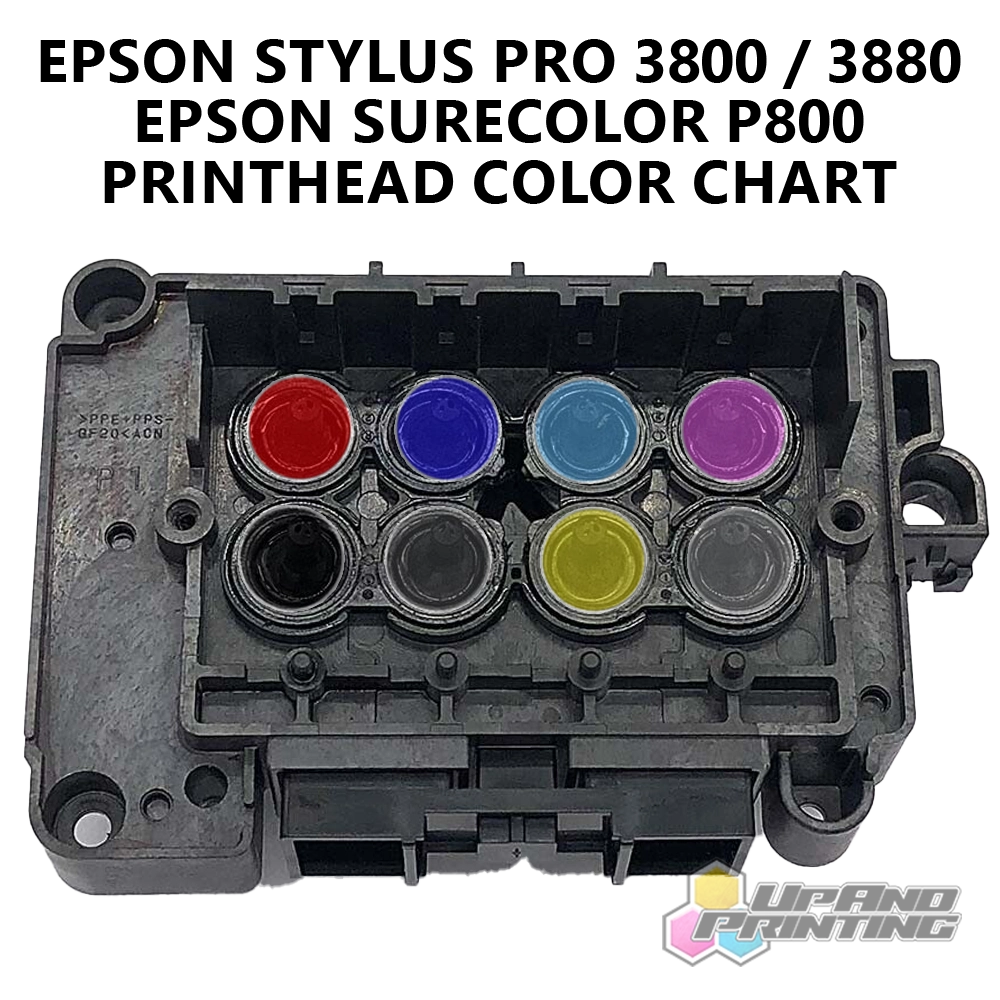
Use a cotton swab to clean the inlet nozzles on the tips. Making sure that each tiny inlet on the nozzle has been swiped over and visibly cleared. Loosen any dried up ink residue around the all of the ink nozzles. Continue until every nozzle has been cleared of ink, including the base of the printhead.
Once the print head inlet nozzles have been cleaned. Fill and carefully attach your printhead flushing syringe to the first problematic color channel from your nozzle print check page. Do not push down on the syringe hard. Make sure the tube connected to the syringe and nozzle are secure before gently pressing repeatedly to figure out how much pressure needs to be applied to push the cleaning solution through the tube, into the ink line, and through the printhead. You will be able to gauge how bad clogs are by how easily, if at all, cleaning solution can push through. Again, do not push down hard or try to force the cleaning solution through the printer or else you can end up with an even bigger mess.
Depending on the severity of the clogged printhead, the cleaning solution could be flowing smoothly through entire system or not at all. If you have any flow whatsoever, keep the pressure on the syringe steady and keep track of how much liquid has come out of the syringe so far. The towel you rested under the printhead can absorb roughly 10ml of liquid before leaking off the sides. The parchment paper is used to prevent any leaking past the paper towel. There is a black sponge strip under the parchment for excess ink spray during printing only.
Repeat these steps for each problematic color channel. Keep an eye on how much cleaning solution has been pushed through. Replace the towel and parchment paper that’s resting under the printhead after each syringe flush. You want the towel to absorb every drop of the liquid deposits that are flushed out.
It’s Important To Note: Before removing the waste ink and cleaning solution soaked towel, it is generally helpful to grab the towel from the left and right side (see image) and slowly slide it left and right like you’re shining a shoe. That will help remove any excess deposits between flushing.
For Tough Clogs
Tougher or complete clogs will require repeated cleaning sessions. Depending on how long the printer sat, the ink inside needs to be softened up again in order to be flushed.
The following method works to clear out even the most dried up ink systems.
Use at your own risk! This should be considered a last resort when trying to salvage a printhead for obvious reasons. It essentially tries to air hammer through the dried ink in the system to allow cleaning solution in, softening the clog enough to pass through safely.
Fill your printhead flushing syringe about 1/3rd of the way with cleaning solution and attach it to the clogged nozzle. Make sure you have a new dry towel and parchment paper under the printhead. With the syringe, slowly start pulling up on the clogged channel. You’ll feel pullback from the pressure you’re now creating within the syringe. Once the syringe is pulled back as far as you’re comfortably pulling, let it go. You’ll hear a funny popping sound from the syringe as it’s trying to push through the ink line.
You will have to continue this procedure until the clog clears. Normally you will be able to tell by gently trying to push printhead cleaning solution through in between pulling back and letting it air hammer the clogged channel.
If you have an ink color channel that is completely clogged, it’s safer and easier to rest a cleaning solution soaked towel and parchment paper under the printhead overnight before attempting this process.
Reassembly
Once you’ve flushed each problem color channel out and have verified only cleaning solution is going through onto the dry towel, it’s time to reassemble the ink system.
Simply reconnect any ribbon cable you disconnected and reattach the ink supply system exactly how you removed it. There should only be two screws needed to reattach the ink system to the printhead. Unless you are planning on modifying and keeping the clear plastic cover installed for aesthetics. Once things are reconnected, gently slide the entire printhead unit to the far right so any residual liquid will fall in the ink pad capping station reservoir.
Now plug in and power on your printer. It will take slightly longer than normal to become ready this time due to how we powered it off before beginning. Once your printer is done the startup process, try printing a nozzle pattern check page. Don’t worry if no ink patterns appear on the colors you just unclogged. This is normal and you will only need to run the head cleaning cycle. If you still do not see any printed results on the channels after up to eight head cleaning cycles, you will have to go back in and perform the same flushing operation on the offending color channel. Take note of any liquids coming out of the clogged channel. It can help explain what may be going on. In most cases, the channel needed an additional flush to clear any debris that collected from the last flush.
When servicing printheads, it’s best to only work on the colors that need unclogging. Unless you are changing the type of ink that will be going through the printhead. In that case, flushing every color would be required.